Performing Color Calibration
Color calibration improves color consistency by compensating for slight differences in how color appears when printing due to individual variations or aging among the printers.
Executing color calibration will print a test pattern (built into the printer) that is then read automatically by the printer.
By this operation, calibration adjustment values reflecting the print result of the test pattern are set automatically.
![]() Important
Important
-
To increase the color stability precision when executing color calibration, maintain a constant temperature and humidity environment each time within the range of temperatures of 59 to 86°F (15 to 30°C) and within the range of humidities of 40 to 60%.
Executing color calibration under various temperature and humidity conditions may prevent the printer from making the correct adjustments.
-
Before color calibration, ensure the printer is not exposed to direct sunlight or other strong sources of light.
If the printer is exposed to strong sources of light, correct adjustment may not be possible.
Recommend Timing for Color Calibration
We recommend color calibration in the following situations.
- After initial printer installation
- After print head replacement
- If colors seem different from before, despite using the same printing environment, under the same conditions
- To print with colors aligned from multiple printers
- When the execution guide is displayed
Executing Color Calibration
- Paper size that can be used for color calibration
- A4 or letter size paper, or A2 or 17 x 22 size paper
Execute color calibration using the following procedure.
-
Select
 Maintenance on the HOME screen.
 -
Select Color calibration.
-
Select Auto adjust.
The confirmation screen will appear.
-
Select Yes.
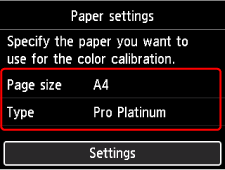
The paper settings screen will appear.
Specify Page size and Type for the paper to be used, select Settings, then press the OK button.
For details, see Media Type and Adjustment Type.
-
Load a single sheet of paper specified in step 4 in the top feed.
 Important
-
You cannot use the manual feed tray when performing color calibration.
-
-
Gently open the paper output tray.
Open the output tray extension, then pull out the paper output support.
-
Press the OK button.
After environmental measurements and paper are checked, color calibration is executed, automatically setting adjustment values.
-
When the completion message appears, press the OK button.
Other Menu Items
-
Enable/disable adjustment values
You can select whether to apply the calibration adjustment value when printing.
However, for settings that differ from Calibration Value of the printer driver, the values specified in the printer driver take priority.
-
Reset adjustment values
Clear the color calibration adjustment value.
